What are password managers?
Password managers are secure encrypted vaults used to store and retrieve your valuables such as passwords, software licenses, and digital certificates at your convenience. Convenient as in you don’t have to lug around a physical iron vault full of passwords written down on posted notes.
They come in different flavors; some are services like DashLane and LastPass where services are to a server in the cloud (internet), and others come as file based apps that store all your information in a file that you control.
They create new hard to crack passwords for each service or application for you. Most password managers even take the pain out of filling out the username & password combinations for websites and apps with some kind of autotype or autofill plugin.
Password managers enable users to create a unique password for each website, service, or application without requiring a user to memorize each password. This is more secure than using the same password for multiple sites.
If you use the same password for your bank and adobe and adobe gets hacked, and then your decrypted password can also be used to access your bank account, especially if you don’t have TFA, 2-factor authentication enabled.
TL;DR Password managers remember your passwords, so you don’t have to.
What is KeePass?
KeePass is a free opensource password manager that stores all your passwords in a single encrypted file. It has multiple features:
- auto typing username & password.
- password encryption
- notes
- tagging
- attaching files
- automatically removes passwords from your clipboard
- searching and sorting
- merging and syncing entries
- offers a variety of plugins
The main features that separate KeePass from many other password managers are:
- KeePass is decentralized, you choose where your data is stored and not storing your data in a centralized place with other user’s data like LastPass makes it less of a desirable target.
- KeePass can be automated so that you can retrieve passwords and secrets from a secure vault.
What to know before installing KeePass
You want to install the 2.x version of KeePass, e.g. KeePass 2.35 or higher.
If you want a portable version, one that can run on a USB stick, download the zip version. Otherwise, download the installer version. On Windows, you can either download the latest installer from the
downloads page or using a tool like chocolatey
to install KeePass.
If you haven’t used Chocolatey before, I highly recommend it for installing most applications on Windows as it verifies installers using checksums.
For those that are installing KeePass via Chocolatey, use the following command.
choco install KeePass -y
For other computer devices, you can install using contributed unofficial KeePass Packages which can be found on the downloads page. Many of the options require installing the Mono runtime.
For Debian packages you should be able to do the following:
deb http://ppa.launchpad.net/jtaylor/keepass/ubuntu trusty main
apt-key adv --keyserver keyserver.ubuntu.com --recv 58B80F90
apt-get update
apt-get install keepass2
Installing KeePass
Double click on the sections below to start a slideshow.
Install KeePass From the downloads page.
Navigate your browser to http://keepass.info/download.html.
Click the top right green button that says Download Now with the following text in smaller print: KeePass 2.35 (Installer EXE for Windows).
This will redirect you to a site called sourceforge. This is where the KeePass installers are stored. The download should automatically start.

Initialize the installer.
Open your file explorer to your Downloads folder. There should be a file in that folder called KeePass-2.35-Setup.exe. If there is a newer version of KeePass, the version number, 2.35, will be higher. e.g. 2.36
Double click on KeePass-2.35-Setup.exe.
A user dialog will show up asking you "Do you want to allow this app to make changes to this device?"
Click Yes
A Wild Dialog Appears
Choose your preferred language. The default is English. Click Ok

License Agreement Dialog
KeePass is licensed under (GPL v2.0)[https://www.gnu.org/licenses/old-licenses/gpl-2.0.en.html]
You must accept this license to install the app.
Select I accept the agreement if you want to KeePass.
Click Next

Destination Dialog
The default location for KeePass is C:\Program Files (x86)\KeePass Password Safe 2, however you can pick a different location.
Click Next

Select Components Dialog
A full installation is suggested.
Click Next

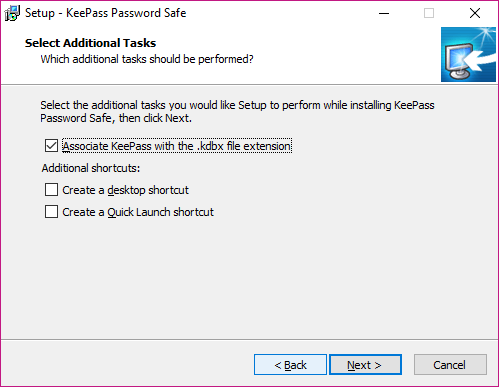
Select Additional Tasks Dialog
By default the Associate KeePass with the .kdbx extension. is checked. If it is not check, make sure to check it.
Check additional shortcuts if desired.
Click Next
Review & Install
Review your choices. If satisfied:
Click Install

Getting Started
Double click on the sections below to start a slideshow.
For this exercise, we’re going to:
- Create a new kdbx, KeePass XML database, file.
- Add a password entry with fake information, so that we have a reason to edit it in a later step.
- Save the database.
- Use the password entry.
- Update the password entry.
- Save the database again.
- Close KeePass
Step 1: Open the start menu
Click the Windows Key. This opens the start menu.
Step 2: Find KeePass
Type KeePass into the start menu
The KeePass 2 app should appear. Hit the enter key.

Step 3: Open the new database dialog
Press Ctrl + N or: Select File > New… from the top left file menu bar.

Step 4: Name and save the database file.
Replace NewDatabase.kdbx with KeePass.kdbx and save the file to your Documents folder.

Step 5: Edit the Create Composite Master Key Dialog
This dialog allows any combination of Master passsword, Key file / provider, and Windows user account to be set. At least one option MUST be selected. Go to the KeePass Composite Master Key Page if you want more information.
Select Master password and input a secure password twice.
Click Ok

Step 6: Database Settings dialog
- Enter KeePass as the Database name
- Enter this is my test KeePass database as the Database description
- Click Custom database color: and choose a color that you like.
Click Ok

Step 7: The main KeePass window
By default, KeePass populates sample data for your new database. It creates seven groups and two sample entry records.
On the left is the list of groups for the KeePass database. The top KeePass folder is the root group. The name of the root group matches the database name from Step 6.
On the right is the list of entries for the current group that is selected. By default, KeePass selects the root group.

Step 8: Change the selected group
Click the Internet group on the left panel. The group should be highlighted, and zero entries in the right panel should now exist.

Step 9: Open the Add Entry dialog
Press Ctrl + I or: Right click in the right panel. A context menu appears. Choose Add Entry

Step 10: Add data to the Add Entry dialog
- Enter Twitter as the Title: field.
- Enter me@gmail.com as the User name: field.
- Enter https://twitter.com/login as the URL: field.
- By default, a password is generated by the password generator.
Click Ok

Step 11: Verify the entry was added
The entry should now show up in the right panel.

Step 12: Save the database.
Press Ctrl + S or click File > Save from the file menu to save the database.

Step 13: Open the url
Highlight the Twitter entry if it is not highlighted. Press Ctrl + U: Or Right click on the entry. A context menu will appear, choose URL > Open.
Your default browser will open to the Twitter login page because we filled out the URL field in step 10.

Step 14: Autotype
Switch from your browser, back to KeePass. Highlight the Twitter entry if it is not highlighted. Press Ctrl + v or Right click on the entry. A context menu will appear,
Select Perform Auto-Type
KeePass will switch the window back to the browser and type in the username and password and attempt to log in into the site for you. (This will fail because its a fake credential for Twitter).

Step 15: Open the Edit Entry dialog.
Highlight the Twitter entry if it is not highlighted. Press the Enter key or right click so that a context menu appears. Choose Edit/View Entry.

Step 16: Change the entry
- Change the User name: field to whatever your twitter username is.
- Change the Password: field.
- Click the triple dots, … button to the right of the password field.
- The password should now be displayed.
- Replace the password with your Twitter password and make sure now one is around while you do so.
- Click the triple dots, … button again.
Click Ok

Step 17: Roundup
Repeat Step 12 and save the database Ctrl + S.
Repeat Step 13 and 14. Press Ctrl + U to open Twitter. Switch back to KeePass. Press Ctrl + V to autotype your password.
Press Ctrl + Q to exit or click File > Exit.
Next Steps
You are now ready to start using KeePass.
For extra credit, store KeePass in a cloud provider like One Drive or Drop Box. Download a KeePass compatible app for your phone like Keepass2Android for Android or KeePass Touch for iOS.
Note: iOS applications typically only work with DropBox for some reason.
